Aseprite Extension
Installation
Set up the extension, servers, and model environment.
Black Magik — Installation Guide
When you first open Aseprite after installing the extension, the setup wizard runs automatically. A browser window will open pointing to the wiki so you can follow along while the terminal does its work.
What the installer sets up automatically
| Component | What it does |
|---|---|
| uv | Python package manager — installed if not already on your PATH |
| Python 3.13 | Downloaded and managed by uv |
| ComfyUI | Cloned from GitHub into the extension folder |
| PyTorch | Installed via uv pip install --torch-backend=auto, which picks the right build for your hardware |
| ComfyUI Manager | Cloned and installed (lets you manage custom nodes from inside ComfyUI) |
| Custom nodes | IPAdapter Plus, ComfyUI Essentials, OpenPose, DepthAnything V3, Inspyrenet Rembg, PixelArt Detector |
| IPAdapter SDXL models | Downloaded from Hugging Face (~several GB) |
| ControlNet models | Downloaded from Hugging Face |
| Middleman server | Python FastAPI server that bridges Aseprite and ComfyUI — dependencies synced with uv |
What the installer does NOT set up
Git
The installer checks for git and will open the download page if it is missing. You must install it yourself before the extension can clone ComfyUI.
- Windows: https://git-scm.com/downloads/win
- macOS: https://git-scm.com/downloads/mac
- Linux: https://git-scm.com/downloads/linux
Aseprite itself
Install Aseprite from https://www.aseprite.org/ before adding this extension.
NVIDIA CUDA drivers (GPU acceleration)
PyTorch is installed with --torch-backend=auto, which automatically selects a CUDA-enabled build if a compatible NVIDIA driver is already present. However, the CUDA drivers themselves must be installed beforehand by you.
How to set up CUDA on Windows
- Check your GPU is CUDA-capable: https://developer.nvidia.com/cuda-gpus
- Install or update your NVIDIA driver from https://www.nvidia.com/drivers
- Download and install the CUDA Toolkit that matches your driver version from https://developer.nvidia.com/cuda-downloads
- After installing Black Magik, verify CUDA is available by running the following in a terminal:
It should printpython -c "import torch; print(torch.cuda.is_available())"True. If it printsFalse, your driver or CUDA version does not match your PyTorch build — reinstall PyTorch with the correct CUDA version from https://pytorch.org/get-started/locally/
How to set up CUDA on Linux
- Install the NVIDIA driver for your distribution (e.g.
ubuntu-drivers autoinstallon Ubuntu) - Install the CUDA Toolkit: https://developer.nvidia.com/cuda-downloads (select your distro)
- Add CUDA to your PATH — the installer typically tells you what to add to
~/.bashrc:export PATH=/usr/local/cuda/bin:$PATH export LD_LIBRARY_PATH=/usr/local/cuda/lib64:$LD_LIBRARY_PATH - Verify:
python -c "import torch; print(torch.cuda.is_available())"
How to set up ROCm (AMD GPU) on Linux
AMD GPU acceleration uses ROCm instead of CUDA. PyTorch with ROCm support can be installed after the fact by running:
uv pip install torch torchvision torchaudio --index-url https://download.pytorch.org/whl/rocm6.2 --python /path/to/comfyUI/.venv
Replace rocm6.2 with the ROCm version that matches your driver. See https://pytorch.org/get-started/locally/
for the full matrix.
macOS (Apple Silicon)
Apple Silicon Macs use the MPS backend automatically — no extra drivers are needed. The --torch-backend=auto flag handles this.
Troubleshooting common install failures
“A virtual environment already exists … do you want to replace it?”
This is fixed as of the current version — the installer now passes --clear to uv venv so it never blocks waiting for input.
If you are on an older version, run the wizard again from Edit > Preferences > Extensions or delete the .venv folder inside the comfyUI directory manually before re-running.
“Project virtual environment … is not a valid Python environment (no Python executable was found)”
This is fixed as of the current version — the installer now sets UV_VENV_CLEAR=1 before running uv sync for the middleman server, which forces uv to recreate a broken virtual environment instead of failing.
If you are on an older version, delete middleman/.venv inside the extension folder and re-run the installer.
The extension folder is located at:
- Windows:
%APPDATA%\Aseprite\extensions\black-magic\ - macOS:
~/Library/Application Support/Aseprite/extensions/black-magic/ - Linux:
~/.config/aseprite/extensions/black-magic/
PyTorch installs a CPU-only build
This happens when CUDA is not detected at install time. After installing your GPU drivers and CUDA toolkit, reinstall PyTorch manually:
uv pip install torch torchvision torchaudio --torch-backend=auto --python /path/to/comfyUI/.venv
Installation fails mid-way
The installer writes a log to setup.log inside the extension folder. Check that file first. If it looks like a bug, use the Report Bug button in the failure dialog — it prefills a GitHub issue with your log details.
Ports used
| Service | Default port |
|---|---|
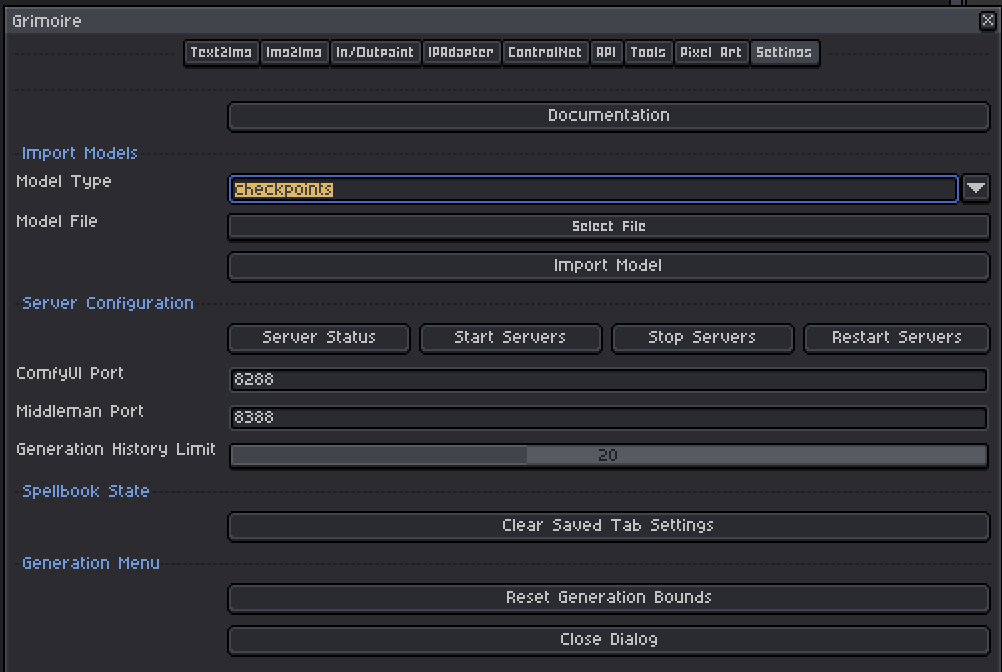
| ComfyUI | 8288 |
| Middleman | 8388 |
These can be changed in the preferences dialog that appears after installation, or later in the Settings tab.
First steps after installation
1. Open the generation dialog
Go to Edit > Black Magik > Generate Image. This is the main interface for all generation features.
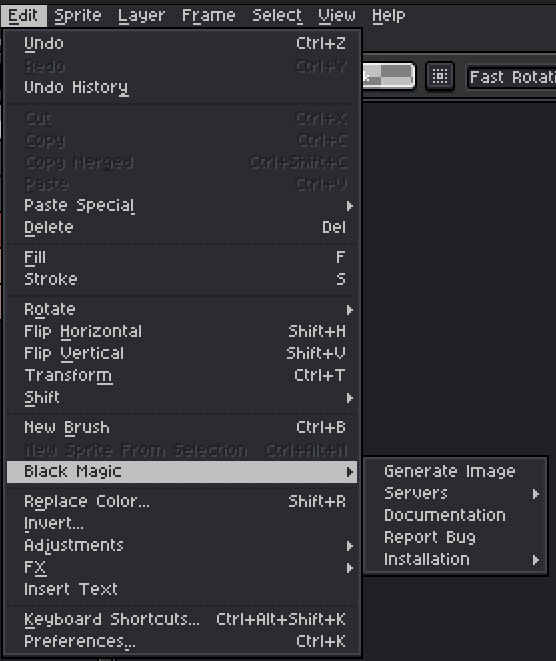
2. Start the servers
Inside the dialog go to the Settings tab and click Start Servers. Both the ComfyUI server and the Middleman server need to be running before you can generate anything.
Alternatively you can start them from the menu at Edit > Black Magik > Servers > Start Servers without opening the full dialog.
3. Check server status
Once started, you can verify both servers are up via Edit > Black Magik > Servers > Server Status. It shows whether each server is running or not and what port it is on. If a server shows as stopped, try Restart Servers from the same submenu.
4. Import a model checkpoint
Without a checkpoint model ComfyUI has nothing to generate with. In the generation dialog:
- Go to the Settings tab
- Click Import Model
- Browse to your
.safetensorsor.ckptcheckpoint file and select it
The model will be copied into ComfyUI’s models directory and become available in the model selector on the generation tabs.

Re-running the installer
Open Aseprite, go to Edit > Black Magik > Installation > Restart Installation. This re-runs the full wizard, letting you keep or clean up existing files first.