Aseprite Extension
IPAdapter
Drive generation from visual references, style, and regional masks.
What Is This?
IPAdapter (Image Prompt Adapter) lets you use a reference image to guide the style, color palette, or visual identity of your generation — in addition to your text prompt. Think of it as showing the model an example of what you want rather than only describing it in words.
Common use cases:
- Generate a new character that looks like an existing reference character.
- Apply the color palette and feel of a reference artwork to a new scene.
- Keep a consistent visual style across multiple generations using the same reference.
- Regional mode: control different spatial zones of the image with different reference images.
Modes
Choose a mode from the Mode dropdown at the top of the tab. Changing the mode rebuilds the entire dialog with the appropriate workflow.
Text2Img + Reference
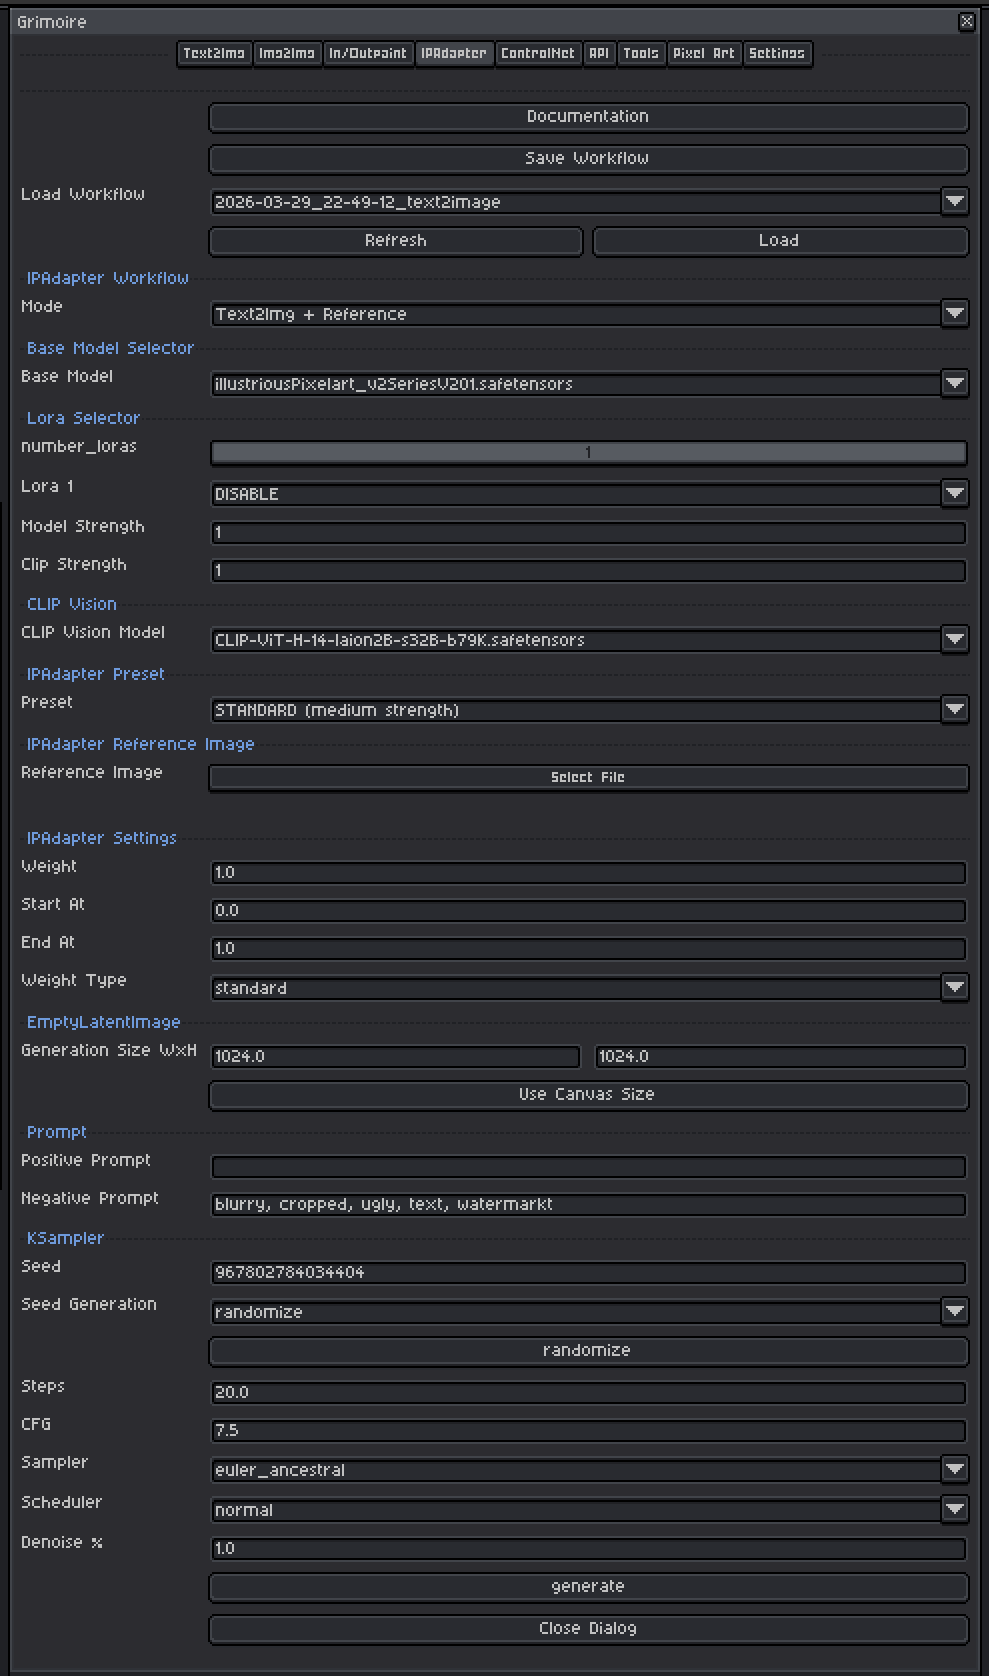
Generates a new image from noise, guided by both your prompt and a single reference image. No input sprite is needed.
Img2Img + Reference
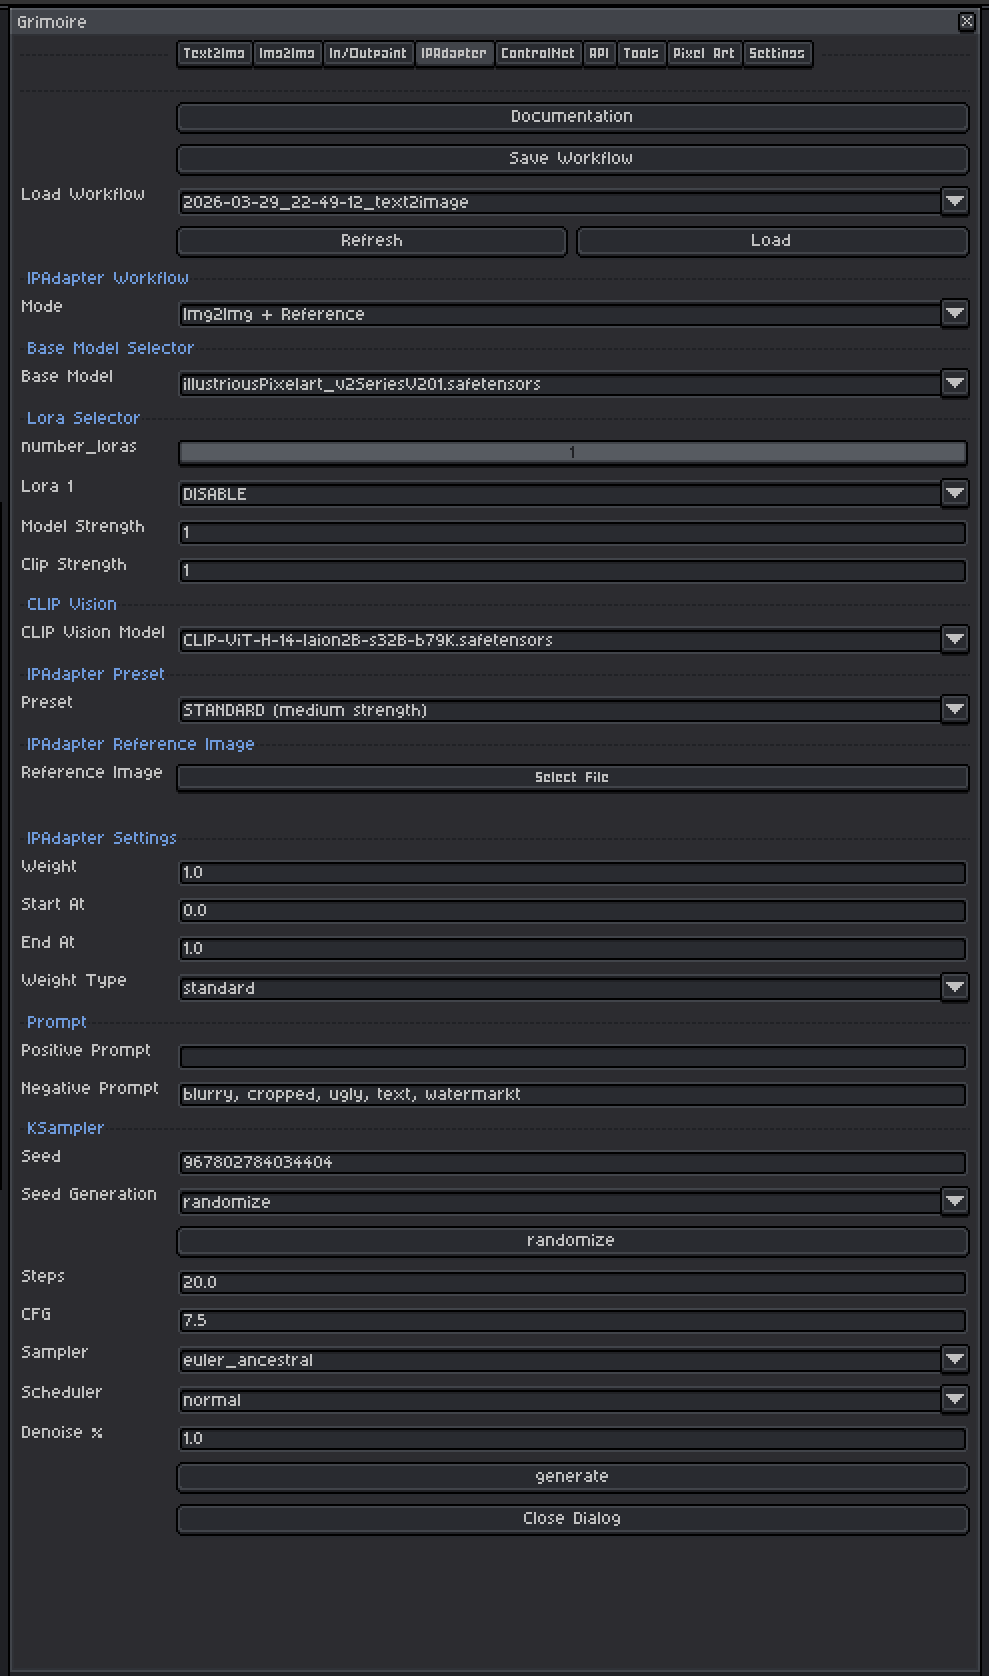
Uses your current canvas as the structural starting point AND a separate reference image for style/visual guidance. Combines structural preservation with IPAdapter style transfer.
Regional + Multi-Reference
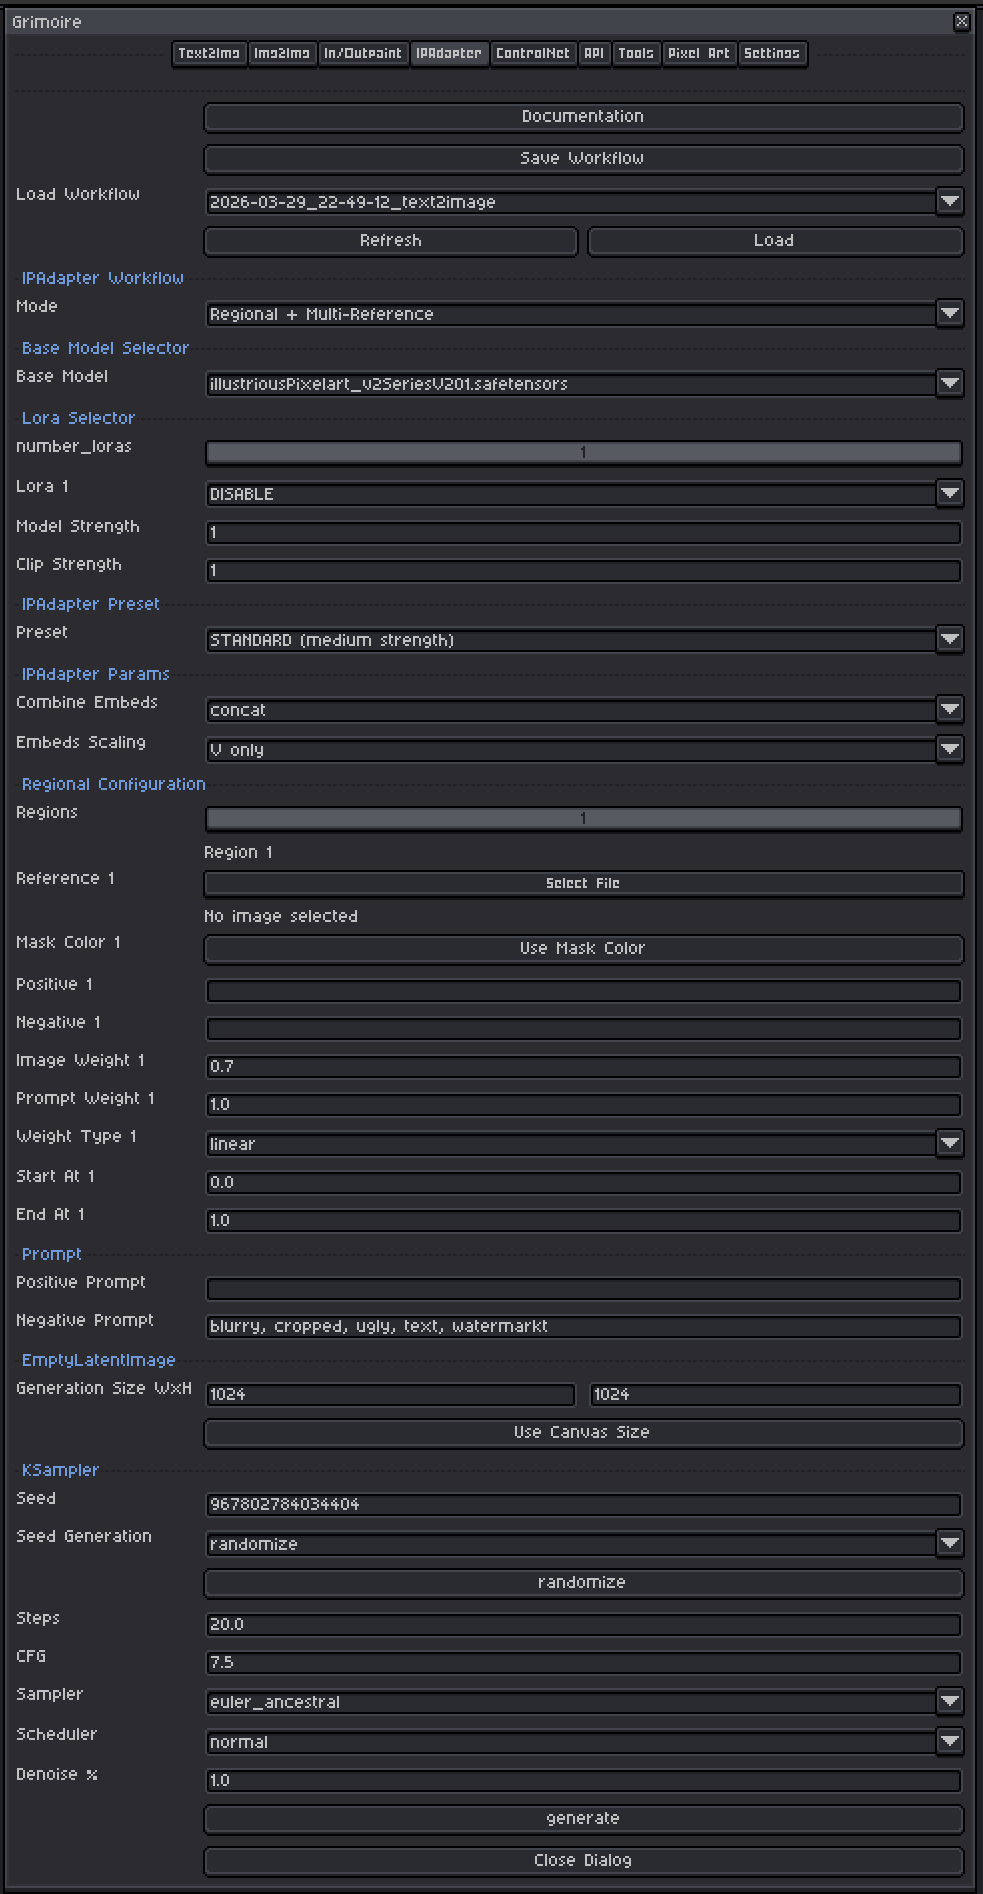
Divides the image into up to 5 color-coded regions, each guided by its own reference image and its own prompt. Useful for generating complex scenes where different areas should look distinct.
Quick Start: Text2Img + Reference
- Set Mode to
Text2Img + Reference. - Pick a Base Model.
- Select a CLIP Vision Model and an IPAdapter Model or Preset.
- Click the Reference Image file picker and choose your reference image.
- Set Weight to
0.6to start. - Set generation size (or click Use Canvas Size).
- Write your Positive Prompt.
- Leave KSampler at defaults and click Generate.
Quick Start: Img2Img + Reference
- Set Mode to
Img2Img + Reference. - Make sure the sprite you want to transform is open and active in Aseprite.
- Pick a Base Model, CLIP Vision Model, and IPAdapter Model/Preset.
- Pick a Reference Image.
- Set Weight to
0.6and Denoise % to0.5in KSampler. - Write your Positive Prompt and click Generate.
Quick Start: Regional + Multi-Reference
- Set Mode to
Regional + Multi-Reference. - Set the Regions slider to the number of distinct areas you want (1–5).
- For each region:
- Pick a reference image.
- Write Positive and Negative prompts for that area.
- Click Use Mask Color to apply that region’s color to your Aseprite foreground color.
- Paint that color onto your canvas where you want the region to apply.
- Configure the global prompt, KSampler settings, and click Generate.
Base Model Selector
A checkpoint is a single file containing a complete, self-contained AI model — think of it as the artist behind your generations. Each checkpoint has been trained on a specific collection of images and has developed its own visual style as a result. One checkpoint might produce photorealistic results, another painterly oil paintings, another crisp pixel art. The checkpoint you pick has the single biggest impact on what your output looks like.
Tips:
- Models trained on pixel art produce pixel art output without extra effort in the prompt.
- SDXL-based models generally produce higher resolution and more coherent results than SD 1.5 models but are slower and need more VRAM.
- The IPAdapter model you choose must match the base model family (SD 1.5 IPAdapters for SD 1.5 checkpoints, SDXL IPAdapters for SDXL checkpoints).
LoRA Selector
LoRAs (Low-Rank Adaptations) are small add-on files that nudge the model toward a specific style, character, concept, or technique without replacing the whole model.
Controls:
| Control | What It Does |
|---|---|
| Number of LoRAs slider | Shows 1–5 LoRA slots. Slots beyond the slider value are hidden and set to DISABLE. |
| LoRA dropdown | Pick which LoRA file to use. Set to DISABLE to skip that slot entirely. |
| Model Strength | Controls how strongly the LoRA pushes the visual output toward its style. At 0.0 the LoRA has no effect; at 1.0 it applies its full influence. |
| Clip Strength | Controls how much the LoRA changes what your prompt words mean to the model. For example, a pixel art LoRA with high Clip Strength might make the word “character” automatically invoke pixel art proportions and conventions even if you don’t write “pixel art” in your prompt. At lower values your words keep their normal meaning while the visual style still shifts. In almost all cases, set this to the same value as Model Strength. |
Recommended ranges:
- Model Strength:
0.5–1.0. Start at0.8. Above1.0often causes over-saturation or artifacts. - Clip Strength: Match Model Strength as your default. Only lower it independently if the LoRA seems to be overriding or confusing your prompts in unexpected ways while the image style still looks correct.
- When using IPAdapter alongside LoRAs, both are influencing style simultaneously. If results look over-styled, reduce LoRA Model Strength to
0.5–0.7.
CLIP Vision Model
The CLIP Vision encoder converts your reference image into a mathematical representation that IPAdapter can work with. You must have a CLIP Vision model installed.
Common models:
CLIP-ViT-H-14-laion2B-s32B-b79K.safetensors— standard SD 1.5 and general use. Good default.CLIP-ViT-bigG-14-laion2B-39B-b160k.safetensors— for SDXL models.
The plugin tries to auto-select the best match from your installed models. If the dropdown is empty, install a CLIP Vision model by placing it in the clip_vision model folder via the Settings tab.
IPAdapter Model or Preset
IPAdapter Model (manual selection)
Specific IPAdapter model files (.safetensors) trained to work with a specific base model architecture.
| Model File | Use With |
|---|---|
ip-adapter_sd15.safetensors |
SD 1.5 — general style transfer |
ip-adapter-plus_sd15.safetensors |
SD 1.5 — stronger style influence |
ip-adapter_sdxl.safetensors |
SDXL — general style transfer |
ip-adapter-plus_sdxl.safetensors |
SDXL — stronger style influence |
Always match the IPAdapter to your base model family (SD 1.5 vs SDXL). Mismatching will produce broken results.
IPAdapter Preset (Unified Loader)
If you have the IPAdapter Unified Loader node installed, you pick a Preset instead of a raw file. Presets bundle the model and CLIP Vision selection together automatically.
| Preset | Effect |
|---|---|
LIGHT - SD1.5 only (medium strength) |
Subtle influence, less aggressive style transfer |
STANDARD (medium strength) |
Balanced general use. Good starting point. |
VIT-G (medium strength) |
SDXL-oriented, strong detail fidelity |
PLUS (high strength) |
High fidelity style transfer. Can overpower the prompt if weight is too high. |
PLUS FACE (portraits only) |
Specialized for face-focused reference transfer |
Reference Image
The image that guides style, color, and visual character. Accepts PNG, JPG, JPEG, or WEBP files.
Tips for good reference images:
- Use a reference that clearly shows the style you want — a clean, uncluttered image works better than a busy one.
- The reference does not need to be the same subject as your prompt. A reference of a forest painting used with a prompt about a city will transfer the forest’s color palette and brushwork to the city scene.
- For pixel art work, use pixel art references. For painterly results, use paintings.
- Resolution does not matter much — even a small reference image is processed at a fixed embedding size internally.
IPAdapter Settings
Weight
Controls how strongly the reference image influences the output. Higher values push the output closer to the reference; lower values let the text prompt dominate.
| Value | Effect |
|---|---|
| 0.3–0.5 | Light influence. Style is subtly present. Text prompt leads. |
| 0.5–0.8 | Recommended range. Both prompt and reference have meaningful influence. |
| 0.8–1.0 | Strong reference influence. Output closely mirrors reference style and palette. |
| 1.0+ | Very strong. Text prompt may be partially overridden. |
Start at 0.6. Adjust up if the reference isn’t visible enough, down if it overpowers your prompt.
Start At / End At
Controls which portion of the diffusion steps IPAdapter is active for.
| Setting | Effect |
|---|---|
Start 0.0, End 1.0 |
IPAdapter is active for the entire generation. Default. |
Start 0.0, End 0.5 |
Active only in early steps (broad composition). Later steps guided only by text. |
Start 0.3, End 1.0 |
Skips early composition steps. Reference influences fine details more than layout. |
Start with 0.0 to 1.0. Experiment with narrower ranges if you want more precise control over where the reference has influence.
Weight Type (if shown)
How the reference image influence is blended across the diffusion steps.
| Type | Effect |
|---|---|
| linear | Even influence throughout. Good default. |
| ease in | Influence starts weak and grows. Reference shapes later details more. |
| ease out | Influence starts strong then fades. Reference shapes broad composition more. |
| ease in-out | Gradual ramp up and down. |
| style transfer | Specialized for pure style (ignores content/composition of reference, only takes aesthetic qualities). |
| composition | Specialized for layout transfer (ignores style/color, copies spatial arrangement). |
Combine Embeds (if shown)
How multiple reference image embeddings are merged. concat is the safe default — only change this if you specifically know why.
Embeds Scaling (if shown)
V only is the standard default. Only change this if you specifically know why.
Noise (if shown)
Adds noise to the image embedding before it is applied. A small amount (0.0–0.1) can add variety between generations. 0.0 is the safe default.
Regional Configuration
Only available in Regional + Multi-Reference mode.
Regions Slider (1–5)
Sets how many distinct regions are active. Slots beyond this count are hidden.
How Mask Colors Work
Each region has a unique assigned color (Region 1 = red, 2 = green, 3 = blue, 4 = cyan, 5 = magenta by default). You paint those colors onto a layer of your canvas to mark which spatial areas belong to which region. The model reads these colors to route each area to the correct regional conditioning.
Workflow:
- Create a new layer in your Aseprite sprite (so you don’t paint over your actual content).
- For Region 1, click Use Mask Color — your foreground color becomes red — then paint the Region 1 area red.
- For Region 2, click Use Mask Color — foreground becomes green — paint the Region 2 area green.
- Repeat for all active regions.
- Leave unpainted areas transparent — they receive the global prompt’s influence.
Per-Region Controls
| Control | What It Does | Recommended Range |
|---|---|---|
| Reference Image | The reference image for this region | — |
| Positive Prompt | Describes what should appear in this region | — |
| Negative Prompt | Describes what to avoid in this region | — |
| Image Weight | How strongly the reference guides this region | 0.5–0.9, default 0.7 |
| Prompt Weight | How strongly this region’s prompt contributes | 0.8–1.2, default 1.0 |
| Weight Type | Blending curve for this region’s influence | linear default |
| Start At | Which step this region becomes active | 0.0 default |
| End At | Which step this region stops being active | 1.0 default |
| Use Mask Color | Sets Aseprite foreground to this region’s mask color | — |
KSampler Settings
The KSampler is the engine that runs the diffusion process. These settings behave the same way across all generation tabs.
Seed
A number that initializes the noise pattern. The same seed + same settings = the same image every time.
| Mode | Behavior |
|---|---|
| fixed | Same seed reused every generation (reproducible) |
| increment | Seed goes up by 1 each time |
| decrement | Seed goes down by 1 each time |
| randomize | New random seed each time |
Use randomize while exploring. Switch to fixed once you find a result worth refining. The seed button manually advances the seed without triggering a generation.
Steps
How many refinement passes the model takes.
| Range | Effect |
|---|---|
| 10–15 | Fast, rougher results |
| 20–30 | Recommended default. Good balance of quality and speed. |
| 40–50 | Slower, marginal quality improvement. |
Start at 20.
CFG (Classifier-Free Guidance Scale)
Controls how strictly the model follows your prompt versus improvising freely. Think of it as a dial between “the model does what it wants” and “the model does exactly what you say.”
| Value | Effect |
|---|---|
| 1–3 | Very loose — model largely ignores the prompt. Creative but unpredictable. |
| 5–7 | Recommended range. Balanced, natural-looking results. |
| 7–9 | More prompt-faithful, but can over-saturate colors or over-sharpen details. |
| 10+ | Very rigid — often produces burnt, over-contrasted, or plastic-looking images. |
Start at 7.0. When IPAdapter weight is high, slightly lower CFG (6–7) can prevent the two influences from fighting each other.
Sampler
The mathematical algorithm used to run the diffusion steps. Think of each sampler as a different strategy for navigating from noise to a finished image — they all reach the destination but take different paths and produce subtly different results.
Recommended default: euler_ancestral
| Sampler | Character |
|---|---|
| euler_ancestral | Fast, slightly painterly, good general purpose. Best starting point. |
| euler | Clean and deterministic. Less variation between generations at the same seed. |
| dpmpp_2m | Efficient — often good quality at 20 steps. |
| dpmpp_sde | Stochastic. Can produce very detailed, slightly different results each run even with a fixed seed. |
Scheduler
Recommended default: normal
| Scheduler | Character |
|---|---|
| normal | Safe general-purpose default. |
| karras | Often improves detail. Pairs well with dpmpp samplers. |
| sgm_uniform | Good for SDXL models. |
Denoise %
| Mode | Default | Notes |
|---|---|---|
| Text2Img + Reference | 1.00 |
Generating from scratch — do not change. |
| Img2Img + Reference | 0.50 |
Balances preserving your input image vs transforming it. Lower = more preserved, higher = more transformed. |
For Img2Img mode, use 0.4–0.6 to preserve structure while transferring style. Use 0.7–0.9 if you want heavy transformation.
Requirements
- IPAdapter and CLIP Vision ComfyUI nodes must be installed. If missing, the tab shows an error message with installation guidance.
- Regional mode additionally requires ComfyUI Essentials nodes (
ConditioningCombineMultiple+and related nodes). - At least one reference image must be selected per active region in Regional mode.
Workflow Tools (Top Bar)
| Tool | What It Does |
|---|---|
| Save Workflow | Saves current settings to a named file. IPAdapter settings and reference image paths are included. |
| Load Workflow | Restores settings from a saved or history workflow. |
| Generate | Runs the generation. Seed updates per the Seed Generation mode. |
Tip: Save workflows when you find a combination you like. You can build a library of different styles and reload them instantly.